|
How to change the battery in Suunto Solution
/ Buddy Nexus dive computers
If you want to save yourself £20 or so and a few
days (even weeks) wait then why not change the battery in your dive computer
yourself?
This works for all flavours of the Solution range (Nitrox / Vario, Solution,
Alpha) and the Buddy Nexus.
First things first, I know this info can be found on
Dave Cordes site,
but having tried this for myself, I have decided to present my findings
here.
What you'll need:
A medium sized crosshead (Phillips) screwdriver,
some silicon grease, sticky tape and a new battery
If you're in the UK, there is a
mail order company www.watchbattery.co.uk
that does the Sonnenschein 1/2AA 3.6v lithium battery required. At the
time of writing, you'll find this battery about 2/3 of the way down this
page
and costs £5.50 Delivery is really quick. Some people report less
than 24hrs, mine took 1.5 days...which is still fast!
Another UK supplier is Cell Pack Solutions www.cellpacksolutions.com
who will supply a suitable battery (code LS14250) for £5.88 incl
vat and delivery. Make sure you specify the 3.6v 1/2AA battery as they
also stock a 3v 1/2 AA battery (code CR1/2AA-DIVERS). This 3v cell is
no good for dive computers. You need the 3.6v cell.
There is also a higher capacity 3.6v cell (1.4Ah opposed to the 1.0Ah
for the other battery) available for £7.05 all-in. The code for
this is: LS14250C
At time of writing, both cells can be found on this
page
To change the battery.......
(click on the images for a larger picture)
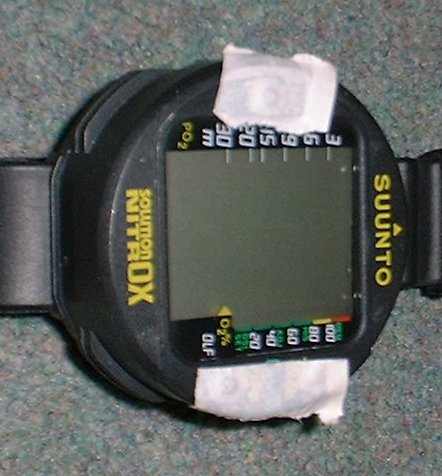
| 1. Cover the metal contacts on the front of the computer
with tape |
 |
| 2. Remove the 4 screws holding the plastic backing
plate in place |
|
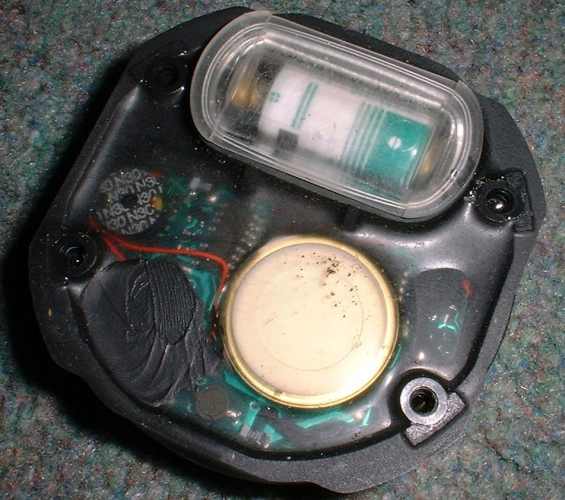
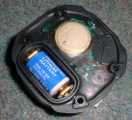
3. The back of the computer will now be revealed.
The business part is all sealed in a flexible gel type sealant making
it impossible to flood (unless of course you damage the gel).
The battery compartment is seperated from the electronics and is sealed
with a clear plastic cover and a sealing 'O' ring. |
 |
| 4. Carefully prise the plastic cover off - it may
be slightly stiff. |
|
| 5. Remove and inspect the O-ring. If its damaged,
obtain a replacement (I've not had to do this, but it should be possible
to get one fairly easily from your local dive shop) |
|
| 6. Remove the old battery |
|
7. Insert the new battery observing the correct polarity
|
 |
| 8. Clean and lightly grease
the O-ring with silicon grease. Lightly grease means that the
O-ring should look shiny - lumps of grease should NOT be present. |
|
| 9. Clean both the plastic cover and
battery compartment where the O ring will sit. Make sure there are
no hairs etc otherwise it will flood. |
|
| 10. Place the O-ring in the channel
of the plastic cover. |
|
| 11. Carefully push the plastic cover
onto the battery compartment. Note, it will not seal itself and try
to push away again. Persevere and it'll eventually stay in place. |
|
| 12. Place the plastic backpiece back onto
the computer module and replace the 4 screws. |
|
| 13. Remove the tape from the contacts and switch
the computer on. |
|
| |
|
On first power up, the battery indicator may remain on.
It should go out after a short while. Or.....in the case of mine just
give up the ghost entirely. This needed another strip down to get it functioning
again.
| Last updated 9th December 2003 |
|
|