
Cheap Underwater Digital Strobe
The page presented here details how you can construct a ridiculously cheap underwater
strobe for the vast majority of cameras - digital or film.
How cheap I hear you ask? How does £40 grab you? That's right, £40
for a fully functional underwater camera strobe.
Where's the catch? No catch, other than you'll have to fly your camera in manual
mode as the strobe will not be TTL compatible. It fires, you adjust the
exposure accordingly.
OK you've got my interest. What do I need then?
You need a slave strobe, an underwater box and some kind of mounting setup (if
you don't want to hand hold the slave). I used a segmented ½" bore
piping system (Loc-Line) to allow for easy adjustment of the strobe. Without
the connectors, it should cost £28!!!
What you need....
The slave strobe required is the Vivitar DF120 digital flashgun. At time of
writing, this cost £18 from 7
day shop.
And now, the bad news. It would appear that 7dayshop are
no longer stocking this flash unit. As for a UK supplier? No idea I'm afraid.
Try google?
The underwater box required is a clear OtterBox 1000. At time of writing, this
cost £10 incl delivery & VAT from psalmgear.
It is 'guaranteed to protect valuables to 100ft'.
For the flexible tubing, this was obtained from Cromwells
at a cost of £7 for an 11" length of flexible tube pieces.
Other bits and pieces are required to fix the arm to your housing and the tubing
to the strobe. Epoxy resin is always handy and is usually available in pound
stores for, unsurprisingly, £1.
You may need some stainless fixings etc. I used stainless steel M6 bolts, washers
and locknuts. These were sourced from a local ironmongers but a chandler's will
do, albeit at a much higher cost. Typically, an M6 x 75mm long SS bolt should
cost about 20p. From a chandlers, you're looking at £1 each.
If you are in the States, all the above is available for significantly less
than we pay here in the UK. The Otterbox should be about $6-12, the tubing about
$6 and the strobe....????
How to do it...
Well, putting the strobe inside the Otterbox is a no brainer. You may want to
hot glue some guides and spacers to hold the strobe in a fixed position. In
reality, there is sufficent space inside the Otterbox to use 2 strobes if you
wish, although this depends on how / if you mount the Otterbox to the arm. Just
remember to power it up before closing the box and observe proper O-ring (the
Otterboxes don't actually use an o-ring, but some compression system) maintenance.
The flexible arm needs a little more detail, however, how you attach to the
camera housing and strobe box is up to you.
Me? I did the following...
First and foremost, you need to check that your underwater camera housing has
a tripod mounting hole on its underside. If not, all is not lost, but your task
is a bit more difficult. This mounting hole will probably be a standard (photography)
size of ¼" thread. To make life easy for connecting the base plate
to the camera, I used a ¼" zinc eye bolt as this allowed even cold
hands to tighten the bolt at any point and not rely on a spanner. No idea if
the thread fitting was luck, but the eyebolt thread matched that of the camera
housings (and camera tripod mounting threads).
At this point, you need to decide if the aluminium plate supplied with the DF120
is sufficient for your needs. If it is, you can skip the construction of the
base plate. If you do decide to use the DF120 bracket, stripping the bit of
rubber from it may be a good idea.
If you decide to construct a base plate, choose a material that isn't corrosive
in seawater, or if it is corrosive, plastic coat it. I had some 2mm thick clear
perspex lying around so ended up making a 6mm thick section by laminating 3
pieces together with epoxy resin. The resultant plate is virtually bulletproof!
The dimensions of my plate were 30mm (1¼"") wide by 190mm (7½"")
long (a single arm base plate). Obviously, this isn't a hard and fast dimension
as your housing dimensions may be different. You need the base plate to extend
around 75mm (3") past the edge(s) of the housing. If you intend making
a multi-strobe base plate, use something around 260mm (10") long rather
than the 190ish (7½"") for a single arm setup.
Not having access to any kind of workshop, the plate was cut using an electric
jigsaw. Not the best tool for the job as the plastic melted and set again after
the blade had done its job. Easy enough to break apart though. On the plus side,
the fact I used a laminated perspex piece prevented the job from shattering
while being worked on. The rough / melted edges of the base plate were cleaned
and chamfered by lightly tickling the plate with my favourite angle grinder
then finished with a sanding block.
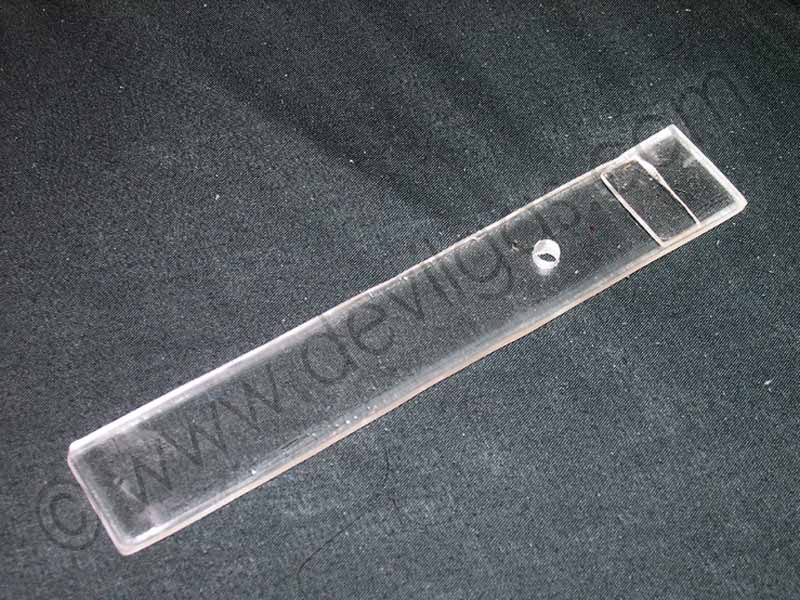
Drill a 6mm (¼") hole to match the location of the tripod mounting
socket. In my case, this was 130mm (7") in from the one edge. Widen the
hole slightly so that your ¼" (6mm) eyebolt moves freely within
the hole. Either use a needle file, rolled up piece of sandpaper or just work
the eyebolt through a few times. The base plate should extend beyond the camera
housing by about 75mm (3"). You can now offer the base plate to the housing.
If the housing allows, epoxying some kind of guide block (a cut to fit bit of
2mm perspex) should help prevent the base twisting in use.
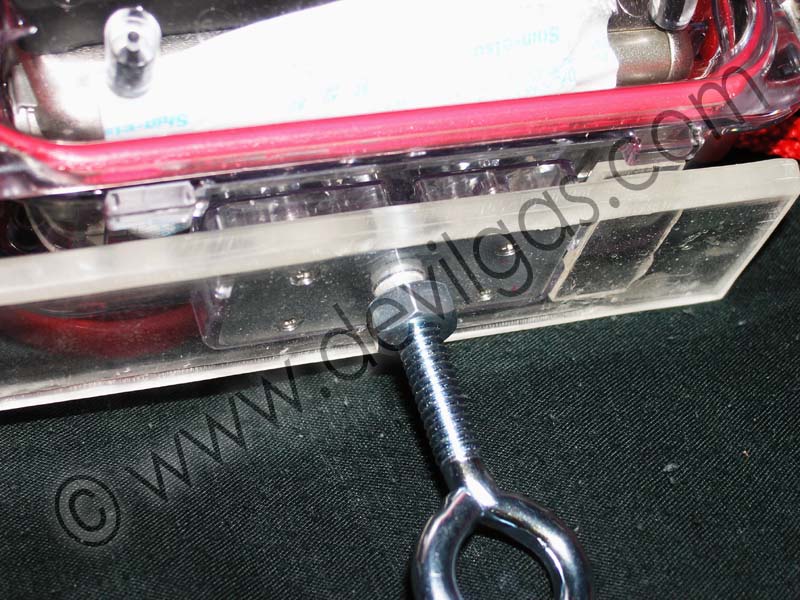
The thread on the eyebolt will be too long and will need cutting. I elected
to leave the supplied nut on the thread but wound it down as far as it could
go, then tightened further with a spanner. This will impact directly onto the
base plate. Feel free to use a 'penny' washer to minimise damage to the base
plate.
Drill another hole about 15mm (5/8") in from the end. This 2nd hole will
be used to mount the flexible arm. Hole size depends on what bolt you use in
the arm.
For the flexible strobe mount, I started by using a 95mm (4") long extender
segment (that's the lighter blue bit in the below photo) as the part that connects
to the base plate and also doubles as a handhold.
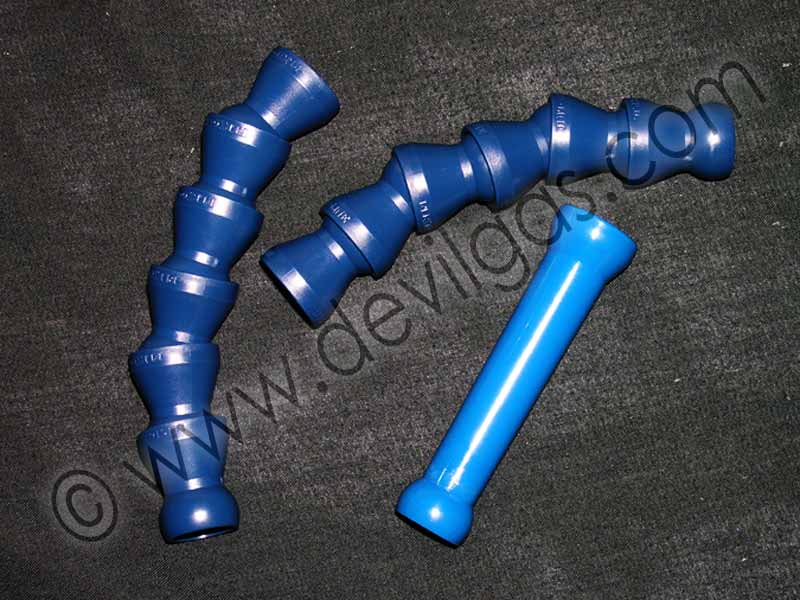
This was mounted to the base plate via a long bolt (or length of threaded bar)
that was captured inside the segment using epoxy resin. Obviously, the extension
piece can be omitted if you have no need for it, but it does make things a little
more useable.
If you omit the extension piece, use a shorter bolt and again, use epoxy resin
to capture it inside one of the pipe segments. Stainless steel bolts are preferable,
but not essential as zinc (not zinc plated) *may* be a suitable alternative.
Obviously, anything with exposed iron is a bad idea as it'll rust pretty rapidly.
You could use nylon bolts, but I don't think they'd be strong enough over the
long term to be beneficial. I chose a 75mm M6 stainless steel bolt with an M6
stainless steel nut and zinc wingnut.
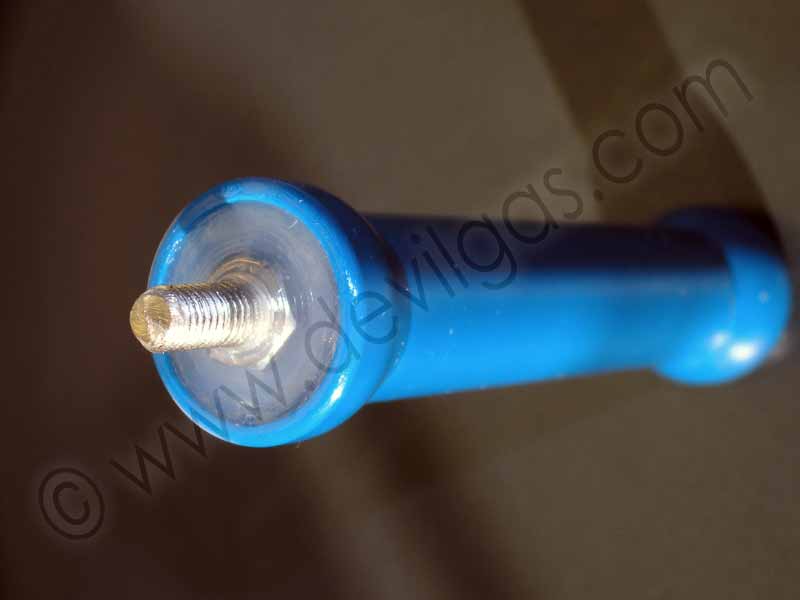
The bolt was set into the handle piece by doing this:
Block the ball end of the handle with gaffer tape or some other suitable material
Prepare the bolt by threading the nut onto it with about 15mm (5/8") of
thread showing. Place a penny washer on next, then tighten down with the wingnut.
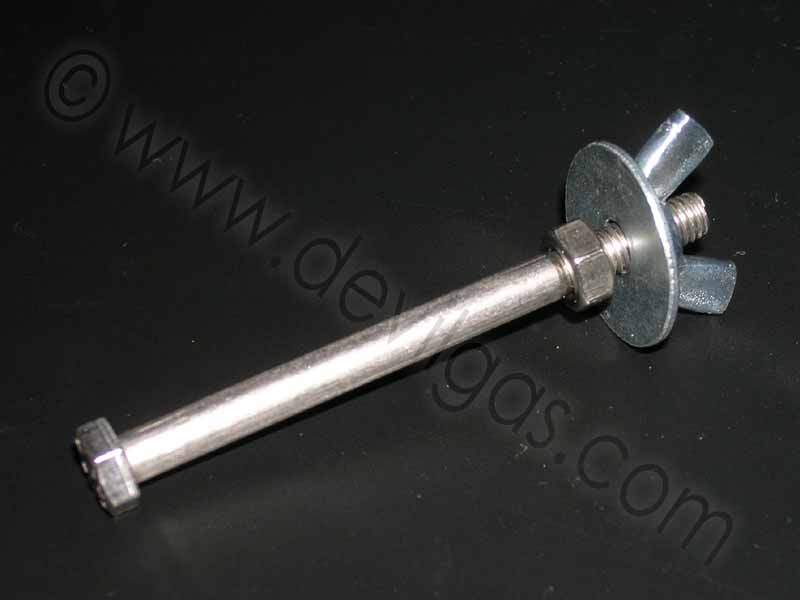
¾ fill the handle section with epoxy resin or hot melt glue and work
the bolt head and shaft into the epoxy / glue until the penny washer rests on
the socket end of the shaft. Feel free to use whatever you feel will work...epoxy
resin, car filler paste / whatever.
Tape the bolt into place and put the handle vertical so that the penny washer
and wingnut are uppermost.
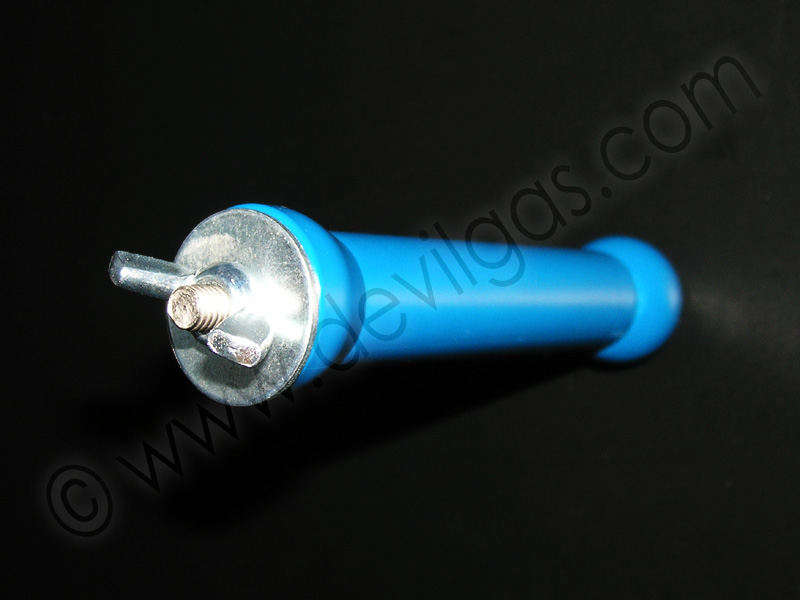
Allow the epoxy to go off fully.
You can now remove the tape at the ball joint end and remove the wingnut and
washer.
Now fill the remainder of the tube with epoxy resin or hot melt glue and allow
it to set fully.
That's the easy bit. You now have to connect the upper part of the fixing to
the Otterbox.
There's various ways of dong this from using tie wraps, rubber bands and who
knows what else. I was after something a little more permanent so went down
a different route. As with most things, your mileage may vary (ahhh, that's
what YMMV means then eh). I'd toyed with various ideas ranging from glueing
the piping to the box, through to drilling 4 holes to run bolts and clamps through.
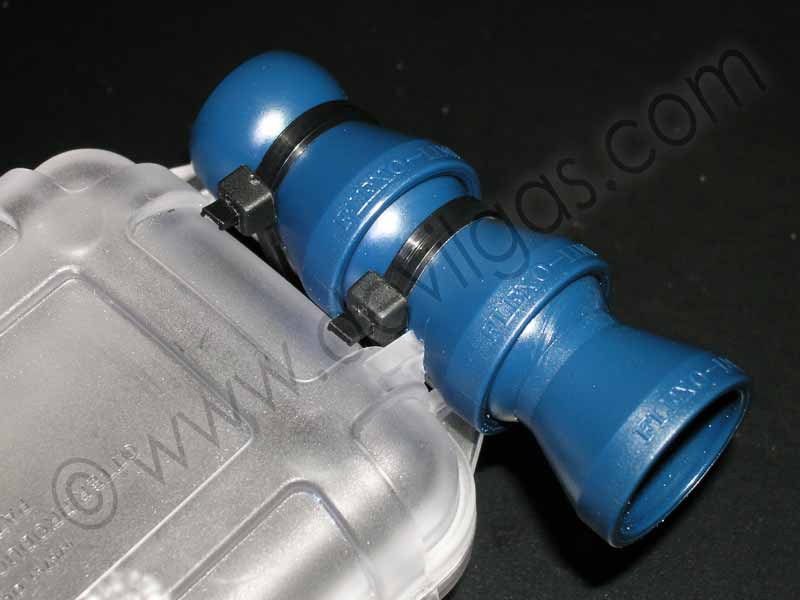
I eventually settled on tie wrapping 2 of the flexible sections to the 'handle'
on the Otterbox.
To accomplish this, I needed to cut a small notch into one of the pipe sections
so that it fit snuggly around that piece of plastic where the lanyard was. Of
course, the other option is to cut away that little lanyard section, but the
notch system gives an extra anchor point.
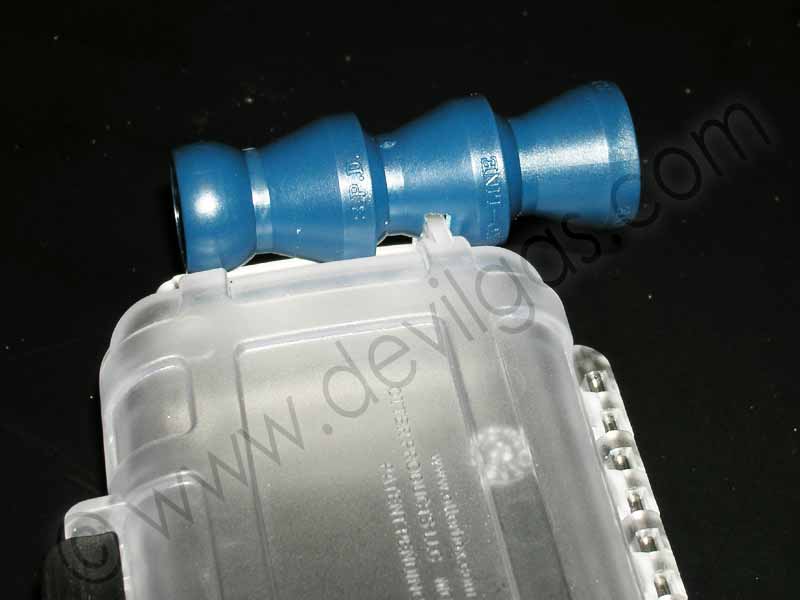
Then it was simply a case of tie wrapping the 2 bits together. The advantage
to this is that you can easily break the system into component parts and quickly
reassemble with a few tie-wraps. And lets face it, what self respecting diver
doesn't have hundreds of these things lying around?
The notch isn't necessary, but i wanted the flash to be as far from the camera
as possible. This setup gets the DF120 on the outside of the arm. Of course,
the box could have been flipped around but then the flash would be firing through
the diffused plastic that forms the 'back' of the Otterbox.
Now you've got your component pieces, it's a case of putting it all together.
I'll be honest, the loc-line stuff is a right pain in the arse to assemble /
break apart. It is designed to carry fluids at pressures of about 3.5 bar so
doesn't easily snap fit together. I ended up buying the assembly / disassembly
pliers for £11 to make the task easier. If you have plugged both ends
of the tubing, you'll need to drill a small hole at either end to allow air
out of the tube during diving and water out of the tube after diving.
The photo below shows the complete assembly and shows the base plate supplied
with the DF120 strobe
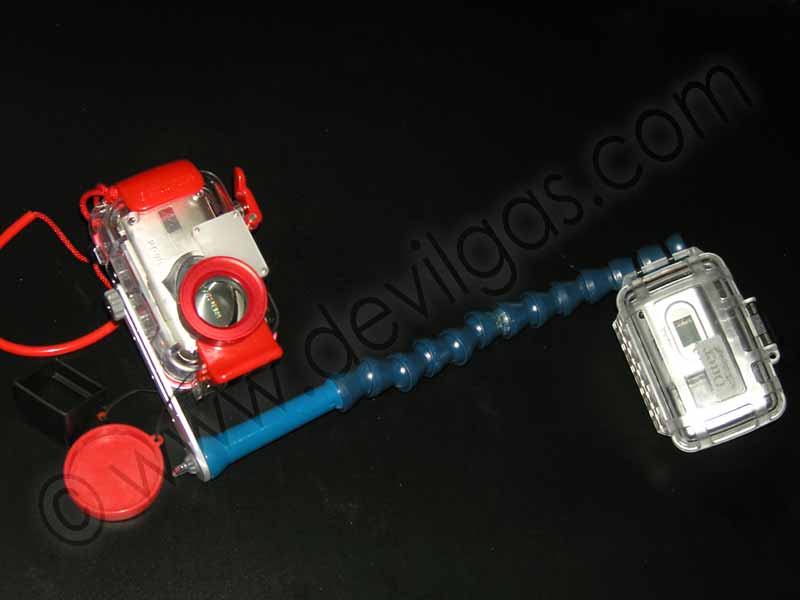
The beauty of this system is that sections can be added / removed as necessary.
Looking at the above photo, the full 11" length of piping looks a little
long so I'll probably end up taking 2 or 3 sections out.
| Item |
Cost
|
Supplier
|
| Vivtar DF120 flashgun ¤¤¤¤ |
£17.99
|
|
| Otterbox 1000 ¤¤¤¤ |
£9.99
|
|
| ½" bore segmented tube system, 2 x 5½" lengths (IND-447-7230K) ¤¤¤¤ |
£6.93
|
|
| ½" bore extender element (KEN-447-2280K) ¤¤¤¤ |
£2.93
|
|
| M6 x 75mm Stainless Steel Bolt, nut, penny washer and zinc wingnut |
£0.30
|
Paget Ltd (Cardiff, UK)
|
| M6 x 75mm Stainless Steel Bolt, nut and washer |
£1.60(!)
|
Marine Chandler
|
| ¼" (6mm) x 2½" zinc eye bolt and nut |
£0.65
|
|
| ¼" Aluminum or perspex base plate |
-
|
scraps
|
|
Total
|
£40
|
| v1.1 | 21st Mar 2006 | 7dayshop bad news added |
| v1 | 17th Jun 2005 | Page created |
|
|
||